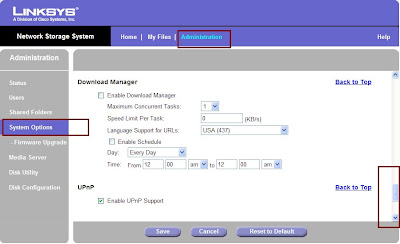
To configure the Download Manager, Open the NAS200 web based User Interface and click on
 Administration Tab. Than select System Options from the Left Hand Side. Here you can Enable / Disable the Download Manager. If the Download Manager feature has been enabled through the Administration > System Options screen and your login has Download Manager access, then the My Downloads option will also be displayed. On this Page in the Identification settings you can configure the network settings like the name of the device and the Workgroup. In the IP Address settings, you can set the device to either as a DHCP client or assign a Static IP Address. Its always recommeneded to assign a Static IP Address. Than comes the DNS Server settings option. Here too you can select between DHCP and static. Than there is WINS and DDNS that works with TZO. If you dont have an account with TZO, you can signup for one from this Option. Than there is Date & Time where you can enable and configure NTP and also see the status of the same. In E-Mail Alert you can configure upto 3 Emails that will be notified if any problem occurs. You need to specify the SMTP port number. Scheduled Shutdown enables you to schedule a Shutdown [:)]. And you have UPnP.


