Showing posts with label gateways. Show all posts

Saturday, March 14, 2009

Firmware released for WAG160N : 1.00.12

Firmware 1.00.12 released for WAG160N.

Release Date: 09 Mar, 2009
Firmware Version: 1.00.12 (ETSI)

Features :
  1. DownloadSpeedTest(), DUT web UI(port 80) will be inaccessible if set buffer size to a large number
  2. v1.00.11, Wireless, Fail to find wireless SSID after set WPA password with "linksys" (7 chars)
  3. GetWLanRadios() cannot return correct WideChannel information
  4. GetDeviceSettings2() will return wrong country code for United Kingdom.
  5. Fix bug that SIP call can not be initialized from WAN to LAN if the SIP Invite packet of the SIP Server does'nt include port information.
  6. Atheros driver's changelist from 6.1.1.98 to 6.1.1.111:
  • Add FCC6 for Australia and Canada 5GHz.
  • Fixed problem in broadcast performance.
  • Disabled power constraint element when country IE is enabled on 2.4GHz channels since some stations will misunderstand the Power Constraint element and cause tx power to be set incorrectly.
  • Re-enabled 11n NF periodic Calibration
  • Fixed a problem where STA cannot reassociate to AP after beacon stuck & HW reset.
  • Enhanced dynamic allocation of TID buffers on ADDBA
  • Fixed throughput degradation issue during downstream TCP legacy co-existence tests
  • Addressed multiple BSSID performance issue.

Thursday, March 5, 2009

ISP settings for Tele2 - Norway

Encapsulation : 1483 Bridged
Multiplexing : LLC
VPI : 8
VCI : 35

ISP setting for UTV internet - UK

Following settings should be configured on the router.
Either from the Setup Page or with the Setup CD.
Encapsulation : PPPoE
Multiplexing : LLC
VPI : 0
VCI : 35

For all Linksys devices that begfin with WAG

Thursday, December 11, 2008

How to check the wireless settings on the Linksys Router ?

How to check the wireless settings on the Linksys Router ?

The wireless settings that you need to note on a router are :

    1. SSID [ Name of the Wireless Network.
    2. Wireless Channel &
    3. Wireless Security.

Step 1 : Open the Setup page of the router.

Step 2 : Click on Wireless [Second tab on the Tab].


Step 3 : Look for Wireless Network Name SSID. If the SSID is Linksys, you can change the name to something else. Also note if the SSID Broadcast is set to Enable or Disable.


Step 4 : Click Wireless Security and note the current Security Settings.


If the Security Mode is set to WEP :

In this Example we are using WEP 64 bits.


If the Security Mode is WPA :

In this example, we are using WPA-TKIP.


Step 5 : Click Save Settings.

Tuesday, August 19, 2008

LELA

Linksys Easy Link Advisor


Linksys Easy Link Advisor (LELA) is an application distributed by Linksys that provides an easy way to setup, manage, view, add and repair the network. Its like having a Linksys geek in your home helping you to get the most out of your home network. LELA comes with all the new routers from Linksys. Linksys EasyLink Advisor automatically sets up your home network. LELA can locate every computer, router, storage unit, camera, print server and other device connected to your network. If you already have a wireles router / modem, LELA can help you to optimise the performance of the network by simplyfing the addition of devices and providing an overview of all the devices those are installed. LELA works in the background, watching your network. It will alert you of new devices, poblems, security vulnerabilities and the updates. LELA 3.0 can be used with any routers that have firmware consist of HNAP.


Look at the following pics and you'll see how easy it is to install and use LELA.


You can select any device from the list as shown in the picture and view its details like the IP Address or MAC Address and even configure the wireless settings like Changing the SSID and Enabling/Disabling the wireless encryption. You can also change the router's password here. Now you nomore need to open the setup page to change the router's password or to configre the wireless settings. It also displays the number of computers and other network devices and their names along with an appropriate icon. You can refresh the page anytime. The refresh button is on the top right hand side. You can kick out any device at any time.


Follow the Welcome Screen to add a computer or any networking device to the network. If you exit the welcome screen, you can add/remove the computers or devices anytime from the LELA application. To connect any device wireless to the network, you need to know the name of the network (SSID) and the encryption (wireless security). You can view the name of the network from the wireless devices and connect. You can change the wireless encryption anytime, but changing the wireless security setting on the router will affect all the wireless devices connected to the router / modem. You'll need to configure the wireless settings on all the computers/devices connected to the router.


While LELA was originally designed for Linksys' N routers, it will still work with most of Linksys' G routers. Linksys recommends that you install Windows XP or Vista (x64 and x86) Operating System on your computer. A minimum of 512 MB RAM is required (1 GB is recommended). The network map shows your network devices, the name of your wireless network (SSID), network status, menu options, alerts (if any), and updates (if any). You can manually check for the updates (From network map/list, click on the Updates button, and then select Check for Updates). It also shows you if any unauthorised device is trying to access your network as shown in the picture. You can stop the Internet access to that device anytime. You can even Print the Network Settings. To change the language, On the network map/list, click on File > Preferences > Language. At the initial launch of LELA 3.0, only the WRT160N and the WRT310N firmware will contain HNAP.

Thursday, August 7, 2008

Wireless Security

Important tips to secure the Wireless Network on the Linksys Router.

Change the default password of the Router / Access Point :

In the setup page click on Administration tab and change the password there, click Save Settings.


Enable Wireless Encryption :
In the Setup page, click Wireless and than click Wireless Security (subtab).

Setup Mac Address Filtering :
Every wireless device has a unique mac address or a physical address. The routers maintains a table that keep track of the mac addresses of all the devices connecting to them. To setup the mac address filtering, on the setup page, click Wireless tab, click Wireless Access (sub tab). By enabling this feature, you can permit / prevent only certain computers' access to the router.
Assign Static IP Addresses to the computers :
By assigning static IP Address to the computer, you wont have to rely on the router's DHCP server. Also you can change the Local IP Address on the router. Remember the IP Addresses that is being assigned to the computers is in the network range of the Local IP Address of the router. After doing this, disable the DHCP on the router. All these settings can be done from the Setup page of the router.
Disable the SSID Broadcast :
If you disable the SSID broadcast the name of the network will no longer be displayed (broadcasted). A wireless profile needs to be created on the computer. Also try not connecting to any free hotspots, as it exposes the computer to security risks. Change the security encryption at regular intervals (eg. after every 2 months)

Tuesday, July 1, 2008

Validating Identity.


I have a WAG160N. Im able to go online from the computers connected to the modem with ethwrnet cable. However when i try connecting from computers those are wireless, im getting this error : Windows cannot find a certificate to logon to the network.
What do i do ?


Solution :

  • Right click wireless connection icon
  • Click on view available wireless network
  • Than click on change advance settings inte left(SP2) or Advance(SP1)
  • Click the second TAB on the top [Wireless networks]
  • Clear preffered networks. Click on ADD below preffered network box.
  • Put in the details for the titles mentioned below

Association(Tab)

  • Network Name (SSID) : Put in your wireless network name
  • Data Encryption should be check
  • Network Authentication(Shared mode) should be unchecked
  • Uncheck the box "The key is provideded for me automatically" and put the network key and confirm it.

Authentication(Tab)

  • Check Enable IEEE 802.1x
  • Now uncheck Authenticate as Computer when computer info is available
  • Now uncheck Authenticate as as guest when user or Computer when computer info is unavailable
  • Uncheck Enable IEEE 802.1x
  • Click OK. Restart the computer. Should start working.

Also if you change the wireless security to WPA2 Personal, the chances of getting the same error are minimal.

Thursday, March 20, 2008

Wireless Range !

Tips to improve the Wireless Range.

How Can the Range of a WiFi Network Be Boosted? The wireless signal strength depends on many variables. Like the position of the Router / Access Point, interfering devices, thickness of the walls, the adapter/receiver on the computers. We will discuss some factors that will help boost the wireless range and performance.
The router should not be placed in an isolated part of the house. The router should not be placed near a Television set or any other electronic devise. Avoid placing the router in a cupboard or behind any thing. If the wireless router is against an outside wall of the house , the signal will be weak on the other side of your home. Common sources of interference in residences include brick or plaster walls, microwave ovens, and cordless phones. But there are many other ways to boost the signal of the wireless network. Try keeping the Access Point / Router elevated from the floor and away from any electronic device. Open the Setup page of the Router [the default IP Address is 192.168.1.1] and change the Wireless Channel. Try different combinations to best optimse the coverage. For N-Series devices, keep the Radio Band to 40 MHz Channel, Wide Channel to 9 and Standard Channel to 11-2.462 GHz. If you are using a N-Series Access point / Router, also use a N-Series adaptgers to enjoy the N-Series Connectivity. If you place the router is a central position of the house, the wireless range will be covered in the entire house [ofcourse depends on the size of the house] all the devices will be able to connect wireless without any hassel. The N-Series provides a maximum speed of 270MBPS. You can also replace the wireless antennas on the router to boost the range. Like high gain antennas. Or adjust the position of the antenna on the router or the computers to get better reception. Try using a Range Expander to extend the wireless signal. Keep the firmware on the router and the drivers on the adapter updated.

Wednesday, August 22, 2007

Cannot connect wireless with WAG54GS.

Error : Limited or No Connectivity.

This issue is encountered with WAG54GS with any of these firmwares : 1.00.06, 1.00.08, 1.00.00, 1.00.10, 1.00.12, 1.01.00, 1.01.01.

Solution : Upgrade the firmware to 1.01.03.

For instructions on upgrading firmware,
Click Here.

Monday, March 26, 2007

WAG200G

Wireless-G ADSL 2+ Router

WAG200G Features :

  • Supports 802.11g and 802.11b wireless LAN.
  • Built-in ADSL modem with G.lite, g.992.3, g.992.5, G.dmt, and T1. 413 support [Firmware upgrade is required for older devices to get this feature activated]
  • Supports 4 10/100 Auto MDI/MDI-X LAN switch ports
  • Enhanced security management functions: Port Filtering, MAC and IP Address Filtering and wireless security.
  • Build-in web graphical user interface for easy configuration from any web browser
  • Support for RFC1483, 2516 PPPoE and 2364 PPPoA connections
  • Statefull Packet Inspection (SPI) firewall with Denial of Service (DoS) prevention
  • Wireless Access Lists to enhance wireless security
  • Supports VPN Passthrough for IPSec, PPTP, and L2TP Protocols
  • Supports Static and Dynamic Routing (RIP1 and 2)
  • DHCP Server capability to assign IP addresses automatically
  • Supports Remote administration and remote
  • E-mail and Web-based Logging of Security Events
  • Supports traffic and event logging
  • Support for NTP (Network Time Protocol) for Synchronizing with a Real-Time Server
  • Support for Wireless SSID Broadcast Disable

Specification

  • Power 12VDC 1A
  • Standards IEEE 802.11g, IEEE 802.11b, IEEE 802.3u, IEEE 802.3, g.992.1 (g.dmt), g.992.2 (g.lite), g.992.3, g.992.5, T1.413i2
  • Ports Power, ADSL, Ethernet (1-4)
  • Buttons Reset [Also can be reset through the WEB Based UI]
  • Cabling Type CAT 5 UTP
  • LEDs Power, Wireless, Ethernet (1-4), DSL, Internet
  • Transmit Power 18 dBm
  • UPnP able.

Thursday, February 1, 2007

Settings for Cable and Wireless.

Settings for Cable and Wireless in UK for any Linksys Modem.

Encapsulation : RFC2364 PPPoA.

Multiplexing : VC

QoS : UBR.

Auto Detect : Disable.

VPI : 0. VCI : 38.

Username : is provided by cable and wireless

Password : is provided by cable and wireless.

Make sure Keep Alive is selected. And Save Settings.

Friday, March 24, 2006

Setup WPA on Linksys Router !

How can I set up WPA on my Linksys Router?

Step 1 : Access the router’s Setup page.

Step 2 : When the router’s web-based, setup page appears, click Wireless and select Wireless Security.

Step 3 :
Select WPA Personal under the Security Mode drop-down menu.

Step 4 : Select TKIP on WPA Algorithms.

Step 5 : Enter your desired WPA Key on the WPA Shared Key field such as “MyPrivateKey.” This will serve as your network key whenever you connect to your wireless network.


NOTE : Do not share this key. This key will secure your wireless network. Leave Group Key Renewal to 3600 seconds.
Step 6 : Click Save Settings.

Monday, March 13, 2006

File and Printer Sharing in Windows 98/ME !

Enabling File and Printer Sharing in Windows 98/ME !


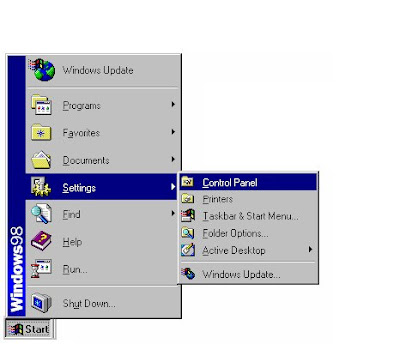
Step 1 : Click Start, Settings, then Control Panel.


Step 2 : Double-click Network and check the following under the Configuration tab:
  • Client for Microsoft Networks
  • IPX/SPX Compatible Protocol > Network Card
  • NetBEUI > Network Card
  • TCP/IP > Network Card
  • File and Printer Sharing for Microsoft Networks

NOTE: If you don't have IPx/SPx, and/or NetBEUI you'll have to click add, protocols, then Microsoft and select which ever protocol you need.


Step 3 : Under Primary Network Log On, set it to Client for Microsoft Networks.
Step 4 : Click File and Printer Sharing and make sure both boxes are checked.
Step 5 : Click the Identification tab and make sure the Workgroup name is identical on all computers on the network. Computer name has to be unique on each computer.
Step 6 : Under Access Control, make sure Share Level Access Control is checked.
Step 7 : Click OK then restart the computer.

Enabling File Sharing

Step 1 : Double-click My Computer.
Step 2 : Right-click the drive then right-click the folder you want to make available to other users.
Step 3 : Click Sharing then the Sharing tab.
Step 4 : Click Share As then enter your drive or folder name in the Share Name field. The name on Share Name may vary depending on your preference.
Step 5 : Decide which type of access you want to give other users. A Read-Only access allows other users to view the files on your PC. Full access allows users to create, change, or delete files on your system. Depends on Password allows users have Read-Only and/or Full access, depending on the password that you decide to share with them.
Step 6 : Use your mouse to select the type of file sharing access you want other users to have. If you want to assign access password(s), type them into the Password fields. When you're done, click Apply then OK. Your drive(s) can now be accessed from other users whenever they click their Windows 95 Network Neighborhood icons. If a user tries to access one of your drives that is password-protected, he/she will be asked for the appropriate Read-Only or Full access password. After the item is shared, you will see a hand appear underneath the folder or hard disk.

Sharing Printers
Step 1 : Double-click My Computer then click the Printers folder.
Step 2 : Right-click the printer you want to share with the other users.
Step 3 : Click Sharing then the Sharing tab.
Step 4 : Click Share As. Look for the Share Name field, give a name to the printer you're about to share. If you want to assign a password to the printer so only certain users can access it, enter it in the Password field.
Step 5 : Click Apply then OK. Your printer(s) are now shared.


NOTE: If you're using Windows 98/ME and want to access a Windows 2000/XP PC, you may not be able to access the shared portions of the Windows 2000/XP computer due to user right restrictions. To get around this, you may want to have the Window 2000/XP PC access the files from the 98/ME machine. Otherwise, you'll need to setup User permissions. Please remember that Linksys does not warrant this information and will not be held responsible for any software corruption as the result of this information. For more information regarding User permissions, check Microsoft’s website or contact their technical support.

Monday, February 27, 2006

File Sharing in Windows 2000 !

File Sharing in Windows 2000.

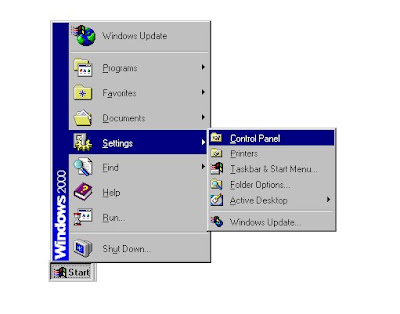
Step : 1 Click Start, Settings, then Control Panel.


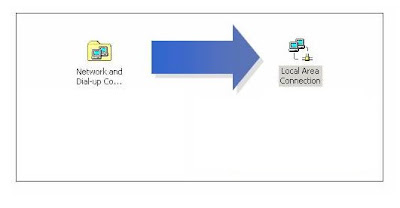
Step 2 : Double-click Network and Dial-up Connections then Local Area Connection.


Step 3 : Check for the following:
  • Client for Microsoft Networks
  • File and Printer Sharing for Microsoft Networks
  • Internet Protocol (TCP/IP)
  • NetBEUI
  • IPx/SPx

NOTE: If you don't have NetBEUI or IPx /SPx please go to Step 4, otherwise proceed to Step 5.


Step 4 : Click Install and select the protocol that needs to be added:

  • NetBEUI
  • IPx/SPx Compatible Protocol


Step 5 : Click Close then Close again to go back to Control Panel.

Step 6 : When the Control Panel appears, double-click System.

Step 7 : When System Properties appears, click Network Identification then Properties.

Step 8 : Make sure the computer name you're using is a unique name and workgroup is selected, not domain.


NOTE: Make sure the computer has the same Workgroup as the rest of the network.

Sunday, February 26, 2006

File And Printer Sharing

Although linksys devices do support file and printersharing, Linksys do not officially provide voice , email or chat support for the same and if you need to still configure it, do it at your own risk.


For Windows XP :


Step 1 : Click Start, then Control Panel.


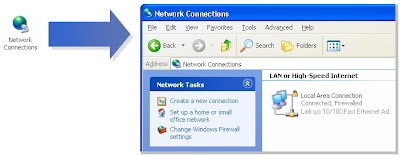
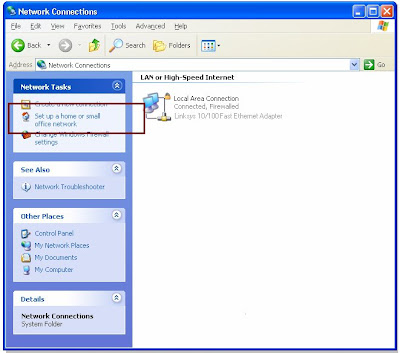
Step 2 : Double-click Network Connections and look for Network Tasks in the left panel.


Step 3 : Select Set up a home or small office network to run the networking wizard.


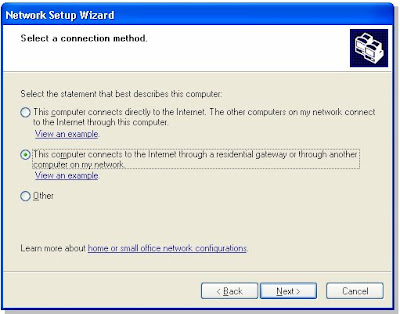
Step 4 : Select This computer connects to the Internet through a residential gateway or through another computer on my network then click Next.


Step 5 : Once the wizard is finished, you'll have to make a floppy disk that you'll run on the other computers on the network to set them up.


Step 6 : Restart the computers. You should now be able to share files.

Friday, December 23, 2005

Change Password on WAG354G !

How to change the Password on WAG354G.
  • Connect a computer to the router.
  • Open a browser [eg. : Internet Explorer].
  • In the Address Bar type : 192.168.1.1 [default IP Address of the router].
  • The default password is admin.
  • Once in the Setup Page, click on Administration TAB.
  • Here you can change the password for the router.