Settings for Cable and Wireless in UK for any Linksys Modem.
Encapsulation : RFC2364 PPPoA.
Multiplexing : VC
QoS : UBR.
Auto Detect : Disable.
VPI : 0. VCI : 38.
Username : is provided by cable and wireless
Password : is provided by cable and wireless.
Make sure Keep Alive is selected. And Save Settings.
Thursday, February 1, 2007


Tuesday, January 2, 2007
WRT54GL with Digiweb !
WRT54GL : Wireless-G Broadband Router.
 All-in-one Internet-sharing Router, 4-port Switch, and 54Mbps Wireless-G (802.11g) Access Point
 All-in-one Internet-sharing Router, 4-port Switch, and 54Mbps Wireless-G (802.11g) Access Point
- Shares a single Internet connection and other resources with Ethernet wired and Wireless-G and -B devices
- Push button setup feature makes wireless configuration secure and simple
- High security: TKIP and AES encryption, wireless MAC address filtering, powerful SPI firewall
How to connect 54GLwith Digiweb in Ireland.
- Connect the computer to any 1 of the 4 ports on the router.
- Reset the router for 10 seconds. The reset button is located at theback side of the router.
- The Powerlight on the router starts flashing. Turn the router OFF & turn the modem OFF.
- Turn the Modem ON first. Wait for 10 seconds. Turn the router ON.
- Try Internet from the computer connected to the router.
- You should be able to go online. If you are not abble to go online, Check the following :
- The computer is not assigned a Static IP Address. If it is, change the setting to Obtain IP Address Automatically.
- Also check the DNS is assigned to Obtain Automatically.
- The connection is done properly.
- To open the Setup page, the default IP Address is : 192.168.1.1
- The default password is admin.
- This process applies to all Linksys routers like WRT54G, WRT54GR, WRT54GC, WRT54GL, WRT54GS, WRT100, WRT150N, WRT160N, WRT300N, WRT310N, WRT330N, WRT350N, WRT600N, WRT610N etc
Tuesday, August 15, 2006
WVC11B quick tip.
Pictures and video images captured by the WVC11B are blurred.
If video captures, images/pictures captured thru WVC11B appear blurred, slightly turn the Focus ring (either clockwise or anti-clockwise) until you get the best results.
If video captures, images/pictures captured thru WVC11B appear blurred, slightly turn the Focus ring (either clockwise or anti-clockwise) until you get the best results.
Friday, March 24, 2006
Setup WPA on Linksys Router !
How can I set up WPA on my Linksys Router?
Step 3 : Select WPA Personal under the Security Mode drop-down menu.
Step 5 : Enter your desired WPA Key on the WPA Shared Key field such as “MyPrivateKey.” This will serve as your network key whenever you connect to your wireless network.

Step 1 : Access the router’s Setup page.
Step 2 : When the router’s web-based, setup page appears, click Wireless and select Wireless Security.
Step 3 : Select WPA Personal under the Security Mode drop-down menu.

Step 4 : Select TKIP on WPA Algorithms.
Step 5 : Enter your desired WPA Key on the WPA Shared Key field such as “MyPrivateKey.” This will serve as your network key whenever you connect to your wireless network.

NOTE : Do not share this key. This key will secure your wireless network. Leave Group Key Renewal to 3600 seconds.
Step 6 : Click Save Settings.
Monday, March 13, 2006
File and Printer Sharing in Windows 98/ME !
Enabling File and Printer Sharing in Windows 98/ME !
Step 1 : Click Start, Settings, then Control Panel.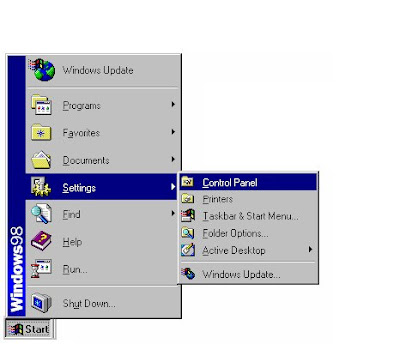
Step 2 : Double-click Network and check the following under the Configuration tab:
Step 1 : Click Start, Settings, then Control Panel.

Step 2 : Double-click Network and check the following under the Configuration tab:
- Client for Microsoft Networks
- IPX/SPX Compatible Protocol > Network Card
- NetBEUI > Network Card
- TCP/IP > Network Card
- File and Printer Sharing for Microsoft Networks
NOTE: If you don't have IPx/SPx, and/or NetBEUI you'll have to click add, protocols, then Microsoft and select which ever protocol you need.
Step 3 : Under Primary Network Log On, set it to Client for Microsoft Networks.
Step 4 : Click File and Printer Sharing and make sure both boxes are checked.
Step 5 : Click the Identification tab and make sure the Workgroup name is identical on all computers on the network. Computer name has to be unique on each computer.
Step 6 : Under Access Control, make sure Share Level Access Control is checked.
Step 7 : Click OK then restart the computer.
Enabling File Sharing
Step 1 : Double-click My Computer.
Step 2 : Right-click the drive then right-click the folder you want to make available to other users.
Step 3 : Click Sharing then the Sharing tab.
Step 4 : Click Share As then enter your drive or folder name in the Share Name field. The name on Share Name may vary depending on your preference.
Step 5 : Decide which type of access you want to give other users. A Read-Only access allows other users to view the files on your PC. Full access allows users to create, change, or delete files on your system. Depends on Password allows users have Read-Only and/or Full access, depending on the password that you decide to share with them.
Step 6 : Use your mouse to select the type of file sharing access you want other users to have. If you want to assign access password(s), type them into the Password fields. When you're done, click Apply then OK. Your drive(s) can now be accessed from other users whenever they click their Windows 95 Network Neighborhood icons. If a user tries to access one of your drives that is password-protected, he/she will be asked for the appropriate Read-Only or Full access password. After the item is shared, you will see a hand appear underneath the folder or hard disk.
Sharing Printers
Step 1 : Double-click My Computer then click the Printers folder.
Step 2 : Right-click the printer you want to share with the other users.
Step 3 : Click Sharing then the Sharing tab.
Step 4 : Click Share As. Look for the Share Name field, give a name to the printer you're about to share. If you want to assign a password to the printer so only certain users can access it, enter it in the Password field.
Step 5 : Click Apply then OK. Your printer(s) are now shared.
NOTE: If you're using Windows 98/ME and want to access a Windows 2000/XP PC, you may not be able to access the shared portions of the Windows 2000/XP computer due to user right restrictions. To get around this, you may want to have the Window 2000/XP PC access the files from the 98/ME machine. Otherwise, you'll need to setup User permissions. Please remember that Linksys does not warrant this information and will not be held responsible for any software corruption as the result of this information. For more information regarding User permissions, check Microsoft’s website or contact their technical support.
Subscribe to:
Posts (Atom)